In 30 seconds
The class and who it suits
Gladiator is a classic melee fighter. One combo, quick Rending Blow into heavy Overhead Slam, drives its damage. Specializations, stigmas, Soul Binding, and Arcana all support that combo.
Choose Gladiator if you want strong damage without a long rotation and do not mind standing next to a boss. Its durability forgives mistakes and lets it back up a party tank.
Your job in combat
What to know first
- Overhead Slam is your main damage skill. It normally needs a knocked-down target, but has a 7% chance to trigger with each attack against an immune boss. Keep pressing the combo.
- Rage Burst opens Overhead Slam for 10 seconds without relying on chance; this is your main damage window.
- Ruinous Blow grants Prepare for Battle for 20 seconds: +20% PvE damage, +100 Critical Hit, and +15% Status Effect Chance. Keep it active.
- Rending Blow's MP-on-critical-hit specialization solves mana problems. Until it unlocks, use Keen Strike to restore MP.
- Follow the same priority for passive leveling and Soul Binding skill rolls so your investments support each other.
Active skills and specializations
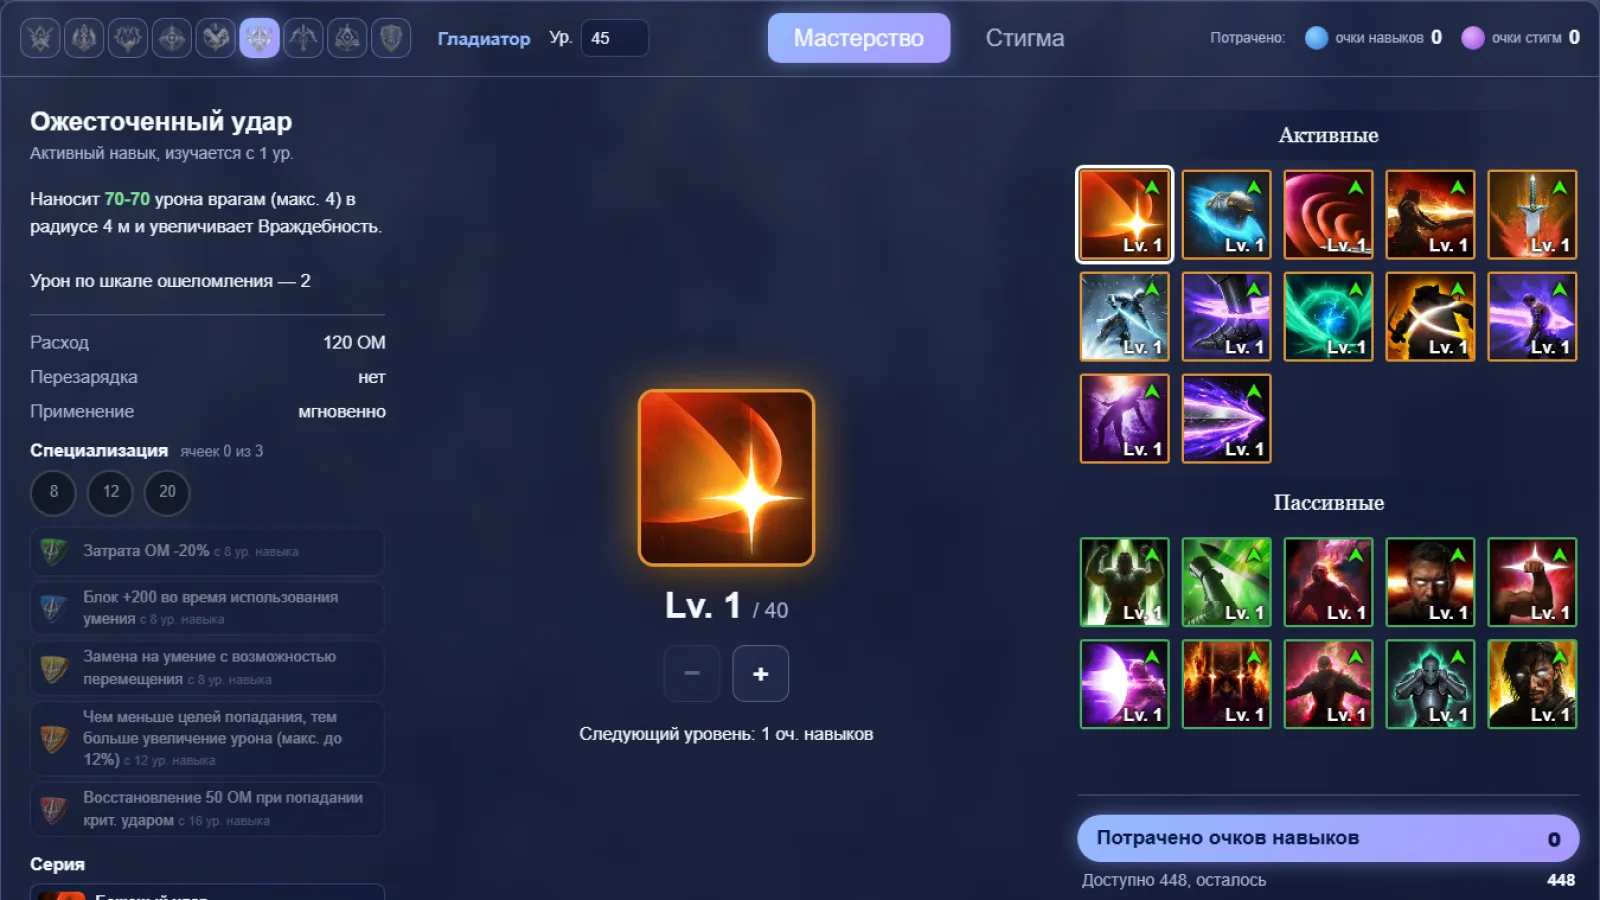
These are the skills worth using and their recommended specializations, ordered by importance. Slots open at skill levels 8, 12, and 20; stronger options appear around levels 12–16. Use what is available, then replace it.
Core combo
 Overhead SlamActive · CD 5s · level to 20Deals 174-174 damage to a target afflicted with Knockdown within 4m and increases Enmity.
 Remove cooldown
 Adds [Upward Strike] Chain Skill
 Critical Hit on hit
 Rending BlowActive · level to 20Deals 70-70 damage to up to 4 enemies within 4m and increases Enmity.
- Restores 50 MP on landing a Critical Hit
- Changes to mobile skill
- Deals up to 12% more damage when less targets are hit
 Ruinous BlowActive · CD 45s · level to 20Rushes to a target within 7.5m to deal 2387-2387 damage to up to 4 enemies nearby and grants Prepare for Battle for 20s.
- Extra damage on hit
 +20% Skill Speed
- Ignores Block and Evasion and lands as Multi-Hit
Support and movement
 Keen StrikeActiveDeals 51-51 damage to up to 4 enemies within 4m and increases Enmity. Restores 100 MP.
- -1s [Ruinous Blow] cooldown on hit
- +50% Multi-Hit on hit
- Adds [Reckless Strike] Chain Skill
 Leaping SlamActive · CD 15sLeaps to a target within 20m and deals 70-70 damage.
- Resets cooldown on defeating an enemy
- Changes to AoE skill and pulls in enemies
- Prepare for Battle effect on the caster for 3s
 Rush StrikeActive · CD 20sMoves to a target within 10m and deals 330-330 damage with a 30% chance to inflict Knockdown for 3s after using [Dodge] or while flying.
 +10m Range
- -10s cooldown
- Restores 300 Stamina on hit
 DefianceActive · CD 60sRemoves Stun, Knockdown, Airborne, Grab, Frost, and Fear from the caster and grants Tenacity for 5s.
- Restores 20% HP on using [Defiance]
- +50% PvE Damage Tolerance and +25% PvP Damage Tolerance for Tenacity duration
- +2s Tenacity duration
Other active skills are situational. Crushing Wave and Ankle Slice help against groups, Mocking Blade damages the stagger bar, Sword Aura Rampage needs a staggered target, and Aerial Snare sees little use.
Active skill leveling order
- Overhead Slam
- Rending Blow
- Ruinous Blow
- Keen Strike
- Rush Strike
- Leaping Slam
- Defiance
 Sword Aura Rampage
 Crushing Wave
 Ankle Slice
 Mocking Blade
 Aerial Snare
Passive skills
Gladiator passives are offensive or defensive. Level offensive ones first; they boost your damage and the party's.
Passive priority
 Experienced CounterstrikePassiveIncreases Front Attack Damage Boost by 0.4%. Increases PvE Damage Boost by 5.4%, PvP Damage Boost by 2.7% for 20s for the caster and party members on Block.Raises front attack damage and, on Block, gives the party PvE damage.
 Attack PreparationPassiveIncreases the caster's PvE Damage Boost by 5.5%, PvP Damage Boost by 2.75%, Defense by 2%, and Accuracy by 100.PvE damage, Defense, and Accuracy.
 Murderous BurstPassiveGrants a stack of Menace for 3s when landing an attack. Removes Menace at 5 stacks and deals 539-539 damage to up to 4 enemies within 5m of the caster and increases the…Builds charges on hits; at five, it bursts and boosts Critical Damage.
 Impact HitPassiveIncreases the caster's Impact-type Chance by 11.2% and Double Chance by 0.3%.Impact-type Chance and Double Chance.
 Identify WeaknessPassiveIncreases the caster's Critical Hit by 100 and Perfect Chance by 0.5%.Critical Hit and Perfect Chance.
 Destructive ImpulsePassiveDeals 146-146 extra damage to targets afflicted with Stagger or an Impact-type status.Damage against staggered targets.
 Survival WillpowerPassiveIncreases the caster's Status Effect Resist by 17%. Increases PvE Damage Tolerance by 12% and PvP Damage Tolerance by 6% for 5s when afflicted with Stun, Knockdown,…Status Effect Resist and Damage Tolerance while controlled.
 Blood AbsorptionPassiveThe caster has a 50% chance to restore 20-24 HP and 1.6% Max HP on landing an attack.Heals you based on damage dealt.
 Survival StancePassiveIncreases the caster's HP by 200. Increases Max HP by an additional 7%, Natural HP Regen by 20, PvE Damage Tolerance by 5.5%, and PvP Damage Tolerance by 2.75%.Basic survival stats.
 Protection ArmorPassiveIncreases the caster's Block by 200 and restores 53-64 HP on Block.Extra defense.
Stigmas
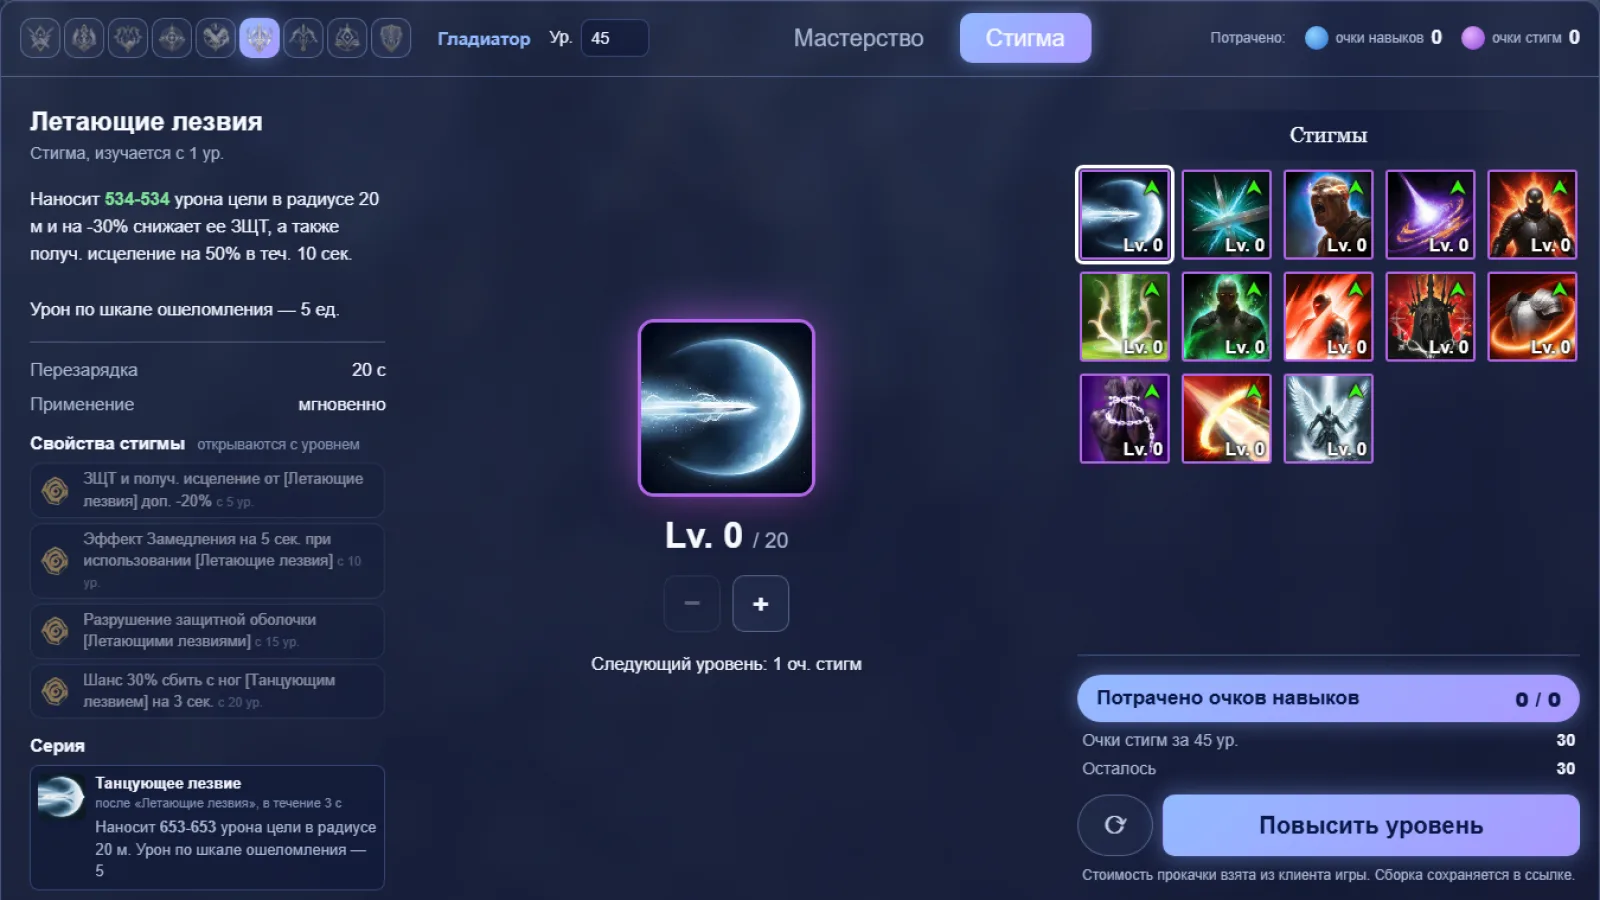
You can equip only a few stigmas and max even fewer. Their +5, +10, +15, and +20 properties unlock automatically; you do not choose them. Your real choice is which stigmas suit the content. Seven usually see use:
Frequently used stigmas
 Rage BurstStigma · CD 45sDeals 1327-1327 damage to a target within 4m. Inflicts Wounded for 10s on hit, reducing the enemy's Attack by -10%, and increases the caster's PvE Damage Boost by 10%…Essential. Opens Overhead Slam for 10 seconds, applies Wounded, and boosts damage. Use on cooldown.
 Lunge StanceStigma · CD 60sIncreases the caster's Combat Speed by 20% for 10s.Combat Speed, Double Chance, a bonus to Identify Weakness, and a chance for critical hits to reduce every skill cooldown by one second.
 Zikel's BlessingStigma · CD 120sIncreases the caster's Attack by 20% and Accuracy by 100 for 10s.Attack, Accuracy, stagger-bar damage, and multi-hit for your burst window.
 Lifestealing BladeStigma · CD 90sDeals 1522-1522 damage to up to 4 enemies within 4m and absorbs 10, 10% HP.Heavy hit with HP absorption; at +10 grants a party-wide buff.
 Wave ArmorStigma · CD 60sDeals 207-207 Damage over Time to up to 4 enemies within 3m of the caster for 10s.Area damage around you, lifesteal, and boosts to Experienced Counterstrike and Murderous Burst.
 Focused BlockStigma · CD 20sTemporarily increases Block Damage Reduction by 100% and guarantees Parry. Restores 110 MP and Stamina once on Parry.Guaranteed Parry that restores MP, DP, and HP and increases movement speed.
 Blade TossStigma · CD 20sDeals 534-534 damage to a target within 20m and reduces Defense by -30% and Incoming Heal by 50% for 10s.Reduces target Defense and healing received. The most situational choice, often for PvP.
Level stigmas fairly evenly. Costs rise sharply with each level, and several midlevel stigmas usually beat one maxed stigma.
Rotation
Gladiator has one basic rule: use buffs on cooldown, and keep alternating Rending Blow and Overhead Slam between them.
Combat cycle
- Step 01 — engageRuinous Blow rushes to the target, deals damage, and grants Prepare for Battle for 20 seconds.
- Step 02 — burstLunge Stance, Zikel's Blessing, and Wave Armor, then Rage Burst and 10 seconds of repeated Overhead Slam. Use Lifestealing Blade on cooldown.
- Step 03 — core loopRending Blow → Overhead Slam while available, and repeat. Each strike has a 7% chance to open Overhead Slam.
Critical hits under Lunge Stance shorten every cooldown, so Rage Burst and Ruinous Blow return sooner. Leaping Slam and Rush Strike bring you back when a boss forces you away.
Macros
Rending Blow → Overhead Slam works well in a macro, but its delay depends on your ping. Test it on a dummy. Keep buffs, Defiance, and movement on separate keys. See the skill macro guide for setup.
Stats
| Main | Divine |
|---|---|
| 1. Might | 1. Wisdom [Lumiel] |
| 2. Precision | 2. Destruction [Zikel] |
| 3. Intelligence | 3. Time [Siel] |
| 4. Constitution | 4. Illusion [Kaisinel] |
| 5. Willpower | 5. Space [Israphel] |
| 6. Dexterity | 6. Death [Triniel] |
| 7. Freedom [Vaizel] | |
| 8. Life [Yustiel] | |
| 9. Destiny [Marchutan] | |
| 10. Justice [Nezekan] |
See the stats guide for what these stats do.
Soul Binding
Aim for options near the top of each list; lower options fill slots as gear opens them. Adjacent priorities can trade places. A passive name means +1 level to that skill.
| Slot | Option priority |
|---|---|
| Weapon | Combat Speed, Weapon Damage Boost, Damage Boost, Might, Precision, multi-hit, Attack |
| Guard | Combat Speed, Weapon Damage Boost, Damage Boost, Might, Precision, multi-hit, Attack |
| Helmet | Double Chance, Experienced Counterstrike, Attack Preparation, Attack, Murderous Burst, Impact Hit |
| Shoulders | Critical Damage Boost, Experienced Counterstrike, Attack Preparation, Murderous Burst, Impact Hit, Attack, Identify Weakness |
| Chest | Damage Boost, Experienced Counterstrike, Attack Preparation, Murderous Burst, Impact Hit, Attack, Identify Weakness or Defense |
| Legs | Damage Tolerance, Perfect Chance, Experienced Counterstrike, Attack Preparation, Impact Hit or Attack, Murderous Burst or Attack |
| Gloves | Combat Speed, Perfect Chance, Experienced Counterstrike, Attack Preparation, Murderous Burst, Impact Hit, Attack |
| Cloak | Double Chance, Perfect Chance, Experienced Counterstrike, Murderous Burst, Attack, Attack Preparation, Impact Hit |
| Boots | Perfect Chance, Movement Speed, Experienced Counterstrike, Attack Preparation, Murderous Burst, Impact Hit or Attack |
| Earrings | Experienced Counterstrike, Attack Preparation, Murderous Burst, Impact Hit, Identify Weakness, Attack, Accuracy or Critical Hit |
| Necklace | Experienced Counterstrike, Attack Preparation, Murderous Burst, Impact Hit, Identify Weakness, Attack, Accuracy or Critical Hit |
| Rings | Overhead Slam, Rending Blow, Ruinous Blow, Attack, Accuracy, Critical Hit; last slot: Leaping Slam, Sword Aura Rampage, or Crushing Wave |
| Bracelet | Wisdom, Destruction, Time, Illusion, Justice, Freedom |
Fill rings last: Arcana roll random skills, and rings cover what you still lack. Aim for level 20 on Overhead Slam, Rending Blow, and Ruinous Blow.
Arcana
Arcana set bonuses depend on dungeons and may change, but their skill rolls remain useful. Seek them in this order:
| Arcana | Skills in priority order |
|---|---|
| Chalice | Attack Preparation, Experienced Counterstrike, Impact Hit, Murderous Burst, Overhead Slam, Ruinous Blow |
| Parchment | Overhead Slam, Ruinous Blow, Leaping Slam, Keen Strike, Ankle Slice |
| Compass | Rending Blow, Defiance, Crushing Wave, Sword Aura Rampage, Rush Strike |
| Bell | Attack Preparation, Survival Stance, Blood Absorption, Survival Willpower, Destructive Impulse |
| Mirror | Murderous Burst, Impact Hit, Experienced Counterstrike, Identify Weakness, Protection Armor |
The Chalice can roll any class skill, so seek your strongest offensive passives there. Other cards have narrower skill pools.
Daevanion

Choose your own route, but prioritize orange nodes, then blue, green, and white. Take offensive stats first and skill nodes in the leveling order above. See the Gladiator boards in Daevanion.
Genus Insight
Genus Insight can waste many resources. On each of its five boards, first get at least 2% Double Chance in slots 3 and 9. Only then lock and reroll other slots.
| Slot | What to seek |
|---|---|
| 1 | Accuracy 35+, Critical Hit 25+, or Boss Attack 14+ |
| 2 | Attack Bonus 14+ |
| 3 | Double Chance 2%+ |
| 4 | Accuracy 35+, Critical Hit 25+, or Boss Attack 14+ |
| 5 | Attack Bonus 14+ |
| 6 | Accuracy 35+, Critical Hit 25+, PvE Damage Tolerance 2.5+, or Boss Attack 14+ |
| 7 | Accuracy 35+, Critical Hit 25+, or Boss Attack 14+ |
| 8 | Attack Bonus 14+ |
| 9 | Double Chance 2%+ |
On the final Varian board, seek Attack Bonus 14+ instead in slots 1, 4, and 7.
Titles
The strongest Gladiators most often wear Playing God for attack, Rule All Creation for defense and Empty Closet for utility. Find their sources in the titles section.
PvE and PvP
Gladiator shines in PvE. Keep Prepare for Battle active, use every Rage Burst window, and position to trigger Experienced Counterstrike's front attack and party bonus on Block.
In PvP, control and survival matter more. Blade Toss lowers target Defense and healing, while Focused Block and Defiance help against enemy burst. Keep a separate PvP stigma set.
Common mistakes
- Waiting for Overhead SlamThe 7% trigger comes from attacks; pausing lowers damage.
- Wasting Rage BurstIts 10-second window disappears while chasing or waiting out boss immunity.
- Losing Prepare for BattleYou lose 20% PvE damage until the next Ruinous Blow.
- Missing MP optionWithout it, you spend time on Keen Strike.
- Maxing stigmas one by oneCosts grow per level; raise several evenly.
- Locking Genus Insight from the endSecure Double Chance in slots 3 and 9 first.
Checklist for harder content
Gladiator ready
- Overhead Slam, Rending Blow, and Ruinous Blow at level 20;
- Rending Blow restores MP on critical hits;
- Overhead Slam has Remove cooldown and guaranteed Critical Hit;
- Rage Burst and Lunge Stance in the stigma set;
- Defiance and movement on separate keys;
- Double Chance at least 2% in slots 3 and 9 of every Genus Insight board;
- macro tested with your ping on a dummy.
The takeaway
Gladiator repeats Rending Blow and Overhead Slam under Prepare for Battle and uses Rage Burst windows on cooldown. Get the three core skills to level 20, add MP restoration and Remove cooldown, and support offensive passives through Soul Binding and Arcana.
Comments